前言
且大部分有对应插件。哎,有插件我不用,我就是玩。
开始
Handsom目录说明
    component/aside.php        左边导航栏
    component/comments.php     评论区
    component/footer.php       底部版权、音乐播放器之类
    component/header.php       页面头,没啥要改的
    component/headnav.php      顶部导航
    component/say.php          时光机动态
    component/sidebar.php      右侧栏目
    component/third_party_comments.php    3.3.0新增,第三方评论
    css/        博客CSS,一般不要改
    fonts/      博客字体,一般不要改
    img/        图像,一般不要改
    js/         js文件,一般不要改
    lang/       语言文件
    libs/Content.php    文章内容
    libs/...    一般不要改
    usr/        另一个语言文件?
    404.php     404界面
    archive.php    整合
    booklist.php   书单
    cross.php      时光机
    files.php      归档
    functions.php  配置界面的东西
    guestbook.php  留言板
    index.php      首页
    links.php      友链
    page.php       文章页面整合
    post.php       文章输出
自定义网站使用的文字,其实有很多插件可以实现此功能,包括但不限于AliceStyle
AliceStyle插件作者@萌卜兔
网站字体修改
使用方法:
打开Handsome主题设置界面,找到“开发者设置”选项在以下两项中加入对应内容即可,字体效果见本站。
- 自定义CSS
/*自定义字体*/
body {font-family: 'ZCOOL XiaoWei';}- 自定义输出head头部的HTML代码
<link rel="stylesheet" type="text/css" href="https://fonts.googleapis.com/css?family=ZCOOL+XiaoWei" />- 其他自定义字体
【站酷快乐体】
自定义CSS:font-family: 'ZCOOL KuaiLe';
Google Fonts API:https://fonts.googleapis.com/css?family=ZCOOL+KuaiLe
当然,如果你动手能力较强,还可以使用其他字体
文章末尾的赞赏按钮跳动
文末赞赏按钮跳动
使用方法:
复制下列代码至 后台>外观>设置外观>开发者设置>自定义CSS
/* 赞赏按钮跳动 */

@keyframes drop {
    0% {
        transform: scale(1);
    }
    50% {
        transform: scale(1.2);
    }
    to {
        transform: scale(1);
    }
}

div.support-author>button.btn-pay {
    animation: drop 1s infinite;
}

button.btn-pay {
    color: #fff!important;
    background-color: #b29d6d;
    border-color: #b29d6d;
}此为插件
代码高亮修改,支持多种语言,但主题自带的似乎就够了,此插件是我以前在主题作者没有开发出现在代码框的时候使用的,现在我已经不用这个了
代码高亮
使用方法:
- 下载本插件,解压放至usr/plugins/目录中
- 文件夹名改为CodePrettify
- 登录管理后台,激活插件
本项修改的是首页头像,将鼠标放至头像后使其转动并放大。
头像呼吸光环和鼠标悬停旋转放大
使用方法:
将以下代码添加至后台主题设置>自定义CSS
/*头像呼吸光环和鼠标悬停旋转放大*/
.img-full {
    width: 100px;
    border-radius: 50%;
    animation: light 4s ease-in-out infinite;
    transition: 0.5s;
}

.img-full:hover {
    transform: scale(1.15) rotate(720deg);
}

@keyframes light {
    0% {
        box-shadow: 0 0 4px #f00;
    }

    25% {
        box-shadow: 0 0 16px #0f0;
    }

    50% {
        box-shadow: 0 0 4px #00f;
    }

    75% {
        box-shadow: 0 0 16px #0f0;
    }

    100% {
        box-shadow: 0 0 4px #f00;
    }
}
如果只需要单色呼吸光环,例如红色,可以将关键帧动画改为:
/*头像呼吸光环:*/
@keyframes light {
    from {
        box-shadow: 0 0 4px #f00;
    }

    to {
        box-shadow: 0 0 16px #f00;
    }
}sunpma的版本是通过在模板自带的开发者选项中插入JS代码实现的标签云上色功能,但由于网站主要的跳转逻辑都是pjax刷新的内容,所以需要额外复制代码到pjax回调函数上,否则切换页面后标签云会掉色
全局彩色标签
使用方法:
将下列代码添加到 设置外观>开发者设置>自定义 JavaScript和 设置外观>PJAX>PJAX回调函数中即可
/*全局彩色标签*/
let tags = document.querySelectorAll("#tag_cloud-2 a");
let colorArr = ["#428BCA", "#AEDCAE", "#ECA9A7", "#DA99FF", "#FFB380", "#D9B999"];
tags.forEach(tag => {
  tagsColor = colorArr[Math.floor(Math.random() * colorArr.length)];
  tag.style.backgroundColor = tagsColor;
});此插件只适用于Handsome主题,未对其它主题优化!!!
为你的博客添加UserAgent
使用方法:
- 下载本插件,解压放到usr/plugins/目录中
- 文件夹名改为UserAgent
- 修改Handsome主题,
component目录下的comments.php代码文件,大概第60~80行左右
<span class="comment-author vcard">
<b class="fn"><?php echo $author; ?></b><?php echo $Identity; ?>
</span>
添加代码 <?php UserAgent_Plugin::get_useragent($comments->agent,$comments->ip); ?> ,修改后代码如下:
<span class="comment-author vcard">
<b class="fn"><?php echo $author; ?></b><?php echo $Identity; ?><?php UserAgent_Plugin::get_useragent($comments->agent,$comments->ip); ?>
</span>- 登录管理后台,激活插件
插件链接:
为网站添加加载完毕的提示,感觉此功能有些鸡肋
网站加载完成提示
使用方法:
复制下面代码到 handsome主题>设置外观>开发者设置>自定义JavaScript
/* 网站加载完成提示开始 */
function kaygb_referrer(){
var kaygb_referrer = document.referrer;
if  (kaygb_referrer != ""){
return "感谢您的访问! 您来自:<br>" + document.referrer;
}else{
return "";
}}
$.message({
    message: "为了网站的正常运行,请不要使用广告屏蔽插件,谢谢!<br >" + kaygb_referrer(),
    title: "网站加载完成",
    type: "success",
    autoHide: !1,
    time: "3000"
})
/* 网站加载完成提示结束 */为文字添加复制成功时的版权提示
复制成功提示
使用方法:
复制下面代码到 handsome主题>设置外观>开发者设置>自定义 JavaScript
/* 复制成功提示代码开始 */
    kaygb_copy();function kaygb_copy(){$(document).ready(function(){$("body").bind('copy',function(e){hellolayer()})});var sitesurl=window.location.href;function hellolayer(){
$.message({
    message: "尊重原创,转载请注明出处!<br> 本文作者:RayCNs<br>原文链接:"+sitesurl,
    title: "复制成功",
    type: "warning",
    autoHide: !1,
    time: "5000"
    })
}}
/* 复制成功提示代码结束 */类似于bilibili的复制后缀,这个功能对于需要大量复制黏贴的网站极其不好,容易挨骂
复制文章带有文章版权
使用方法:
复制下面代码到 handsome主题>设置外观>开发者设置>自定义 JavaScript
/* 复制文章自动带版权开始 */
document.body.addEventListener('copy', function (e) {
    if (window.getSelection().toString() && window.getSelection().toString().length > 42) {
        setClipboardText(e);
     notie({
  type: 'info',
  text: '商业转载请联系作者获得授权,非商业转载请注明出处,谢谢合作。',
  autoHide: true
})
    }
});
function setClipboardText(event) {
    var clipboardData = event.clipboardData || window.clipboardData;
    if (clipboardData) {
        event.preventDefault();

        var htmlData = ''
            + '著作权归作者所有。<br>'
            + '商业转载请联系作者获得授权,非商业转载请注明出处!<br>'
      + '本博转载文章版权及解释权归原作者所有,博主只是勤劳的搬运工!<br>'
            + '作者:RayCNs.com<br>'
            + '链接:' + window.location.href + '<br>'
            + '来源:https://www.raycns.com/<br><br>'
            + window.getSelection().toString();
        var textData = ''
            + '著作权归作者所有。\n'
            + '商业转载请联系作者获得授权,非商业转载请注明出处!\n'
      + '本博转载文章版权及解释权归原作者所有,博主只是勤劳的搬运工!\n'
            + '作者:RayCNs.com\n'
            + '链接:' + window.location.href + '\n'
            + '来源:https://raycns.com/\n\n'
            + window.getSelection().toString();

        clipboardData.setData('text/html', htmlData);
        clipboardData.setData('text/plain',textData);
    }
}
/* 复制文章自动带版权结束 */为你的博客文章末尾添加版权显示。
使用方法:
- 下载本插件,解压放至usr/plugins/目录中
- 文件夹名改为Copyright
- 登录管理后台,激活插件
添加底部页脚标签样式,详情请看本站页脚
Handsome底部页脚标签
使用方法:
- 添加自定义css
添加代码至后台>自定义 CSS
/*页脚标签样式*/
.github-badge {
    display: inline-block;
    border-radius: 2px;

    text-shadow: none;
    font-size: 10px;
    color: #fff;
    line-height: 13px;

    background-color: #ABBAC3;

    margin-bottom: 3px;
}

.github-badge .badge-subject {
    display: inline-block;
    background-color: #4D4D4D;
    padding: 2px 2px 2px 3px;
    border-top-left-radius: 2px;
    border-bottom-left-radius: 2px;
}

.github-badge .badge-value {
    display: inline-block;
    padding: 2px 3px 2px 2px;
    border-top-right-radius: 2px;
    border-bottom-right-radius: 2px;
}

.github-badge .bg-brightgreen {
    background-color: #4c1 !important;
}
.github-badge .bg-green {
    background-color: #97CA00 !important;
}
.github-badge .bg-yellow {
    background-color: #dfb317 !important;
}
.github-badge .bg-zise {
    background-color:#F08080 !important;
}
.github-badge .bg-orange {
    background-color: #fe7d37 !important;
}
.github-badge .bg-red {
    background-color: #e05d44 !important;
}
.github-badge .bg-blue {
    background-color: #007ec6 !important;
}
.github-badge .bg-grey, .github-badge .bg-gray {
    background-color: #555 !important;
}
.github-badge .bg-lightgrey, .github-badge .bg-lightgray {
    background-color: #9f9f9f !important;
}- 选择显示位置
打开Handsome主题设置>博客底部左侧信息添加以下代码
<a class="github-badge">
     <span class="badge-subject">Copyright</span>
     <span class="badge-value bg-brightgreen">XXX</span>
</a>
|
<a class="github-badge" target="_blank" href="https://beian.miit.gov.cn">
     <span class="badge-subject">皖 ICP备</span>
     <span class="badge-value bg-red">20002006号-3</span>
</a>
打开 Handsome主题设置>博客底部右侧信息添加以下代码
<a class="github-badge" target="_blank" href="https://www.ihewro.com/">
     <span class="badge-subject">Themes</span>
     <span class="badge-value bg-blue">Handsome</span>
</a>
|
<a class="github-badge" target="_blank" href="https://typecho.org">
     <span class="badge-subject">Powered</span>
     <span class="badge-value bg-orange">Typecho</span>
</a>- 删除多余代码
位置在125-140行之间
删除usr/themes/handsome/component/footer.php中以下代码
Powered by <a target="_blank" href="http://www.typecho.org">Typecho</a> | Theme by <a target="_blank"
                                                                                                     href="https://www.ihewro.com/archives/489/">handsome</a>
© <?php echo date("Y"); ?> Copyright 
此插件可使用多种不同的鼠标图标,且可以添加点击效果
炫彩鼠标指针图标及点击效果
使用方法:
- 下载本插件,解压放到usr/plugins/目录中
- 文件夹名改为HoerMouse
- 登录管理后台,激活插件
首页文章添加圆角效果
首页文章添加圆角效果
使用方法:
复制以下代码至 主题开发者设置>自定义CSS
/*首页文章版式圆角化*/
.panel{
    border: none;
    border-radius: 15px;
}

.panel-small{
    border: none;
    border-radius: 15px;
}

.item-thumb{
    border-radius: 15px;
}博主介绍的彩色打字特效
博主介绍彩色打字特效
使用方法:
复制一下代码到 主题设置>初级设置>博主介绍
<span class="text-muted text-xs block">
<div id="chakhsu"></div>
<script> var chakhsu = function (r) {
function t() {
    return b[Math.floor(Math.random() * b.length)]}
function e() {
    return String.fromCharCode(94 * Math.random() + 33)
}
function n(r) {
    for (var n = document.createDocumentFragment(), i = 0; r > i; i++) {
        var l = document.createElement("span");
        l.textContent = e(), l.style.color = t(), n.appendChild(l)
}
return n
}
function i() {
    var t = o[c.skillI];
    c.step ? c.step-- : (c.step = g, c.prefixP < l.length ?
    (c.prefixP >= 0 && (c.text += l[c.prefixP]), c.prefixP++) : "forward" === c.direction ?                 c.skillP < t.length ? (c.text += t[c.skillP], c.skillP++) : c.delay ?
c.delay-- : (c.direction = "backward", c.delay = a) : c.skillP > 0 ?
(c.text = c.text.slice(0, -1), c.skillP--) : (c.skillI = (c.skillI + 1) % o.length, c.direction = "forward")), r.textContent = c.text, r.appendChild(n(c.prefixP < l.length ?
Math.min(s, s + c.prefixP) : Math.min(s, t.length - c.skillP))), setTimeout(i, d)
}
var l = "", o = ["修改我" ].map(function (r) {return r + ""}), a = 2, g = 1, s = 5, d = 75, b = ["rgb(110,64,170)", "rgb(150,61,179)", "rgb(191,60,175)", "rgb(228,65,157)", "rgb(254,75,131)", "rgb(255,94,99)", "rgb(255,120,71)", "rgb(251,150,51)", "rgb(226,183,47)", "rgb(198,214,60)", "rgb(175,240,91)", "rgb(127,246,88)", "rgb(82,246,103)", "rgb(48,239,130)", "rgb(29,223,163)", "rgb(26,199,194)", "rgb(35,171,216)", "rgb(54,140,225)", "rgb(76,110,219)", "rgb(96,84,200)"], c = {text: "", prefixP: -s, skillI: 0, skillP: 0, direction: "forward", delay: a, step: g};
i() };
    chakhsu(document.getElementById('chakhsu'));
    </script>
</span>
</span>ActivatePowerMode插件,为网站添加打字烟花及震动特效
使用方法:
- 下载本插件,解压放到usr/plugins/目录中
- 文件夹名改为ActivatePowerMode
- 登录管理后台,激活插件
美化网站右侧的滚动条,效果见本站
右侧滚动条美化
使用方法:
复制下面代码到 handsome主题>设置外观>开发者设置>自定义CSS
/*定义滚动条高宽及背景 高宽分别对应横竖滚动条的尺寸*/
::-webkit-scrollbar {
    width: 8px;
    height: 6px
}
/*定义滚动条轨道*/
::-webkit-scrollbar-track {
    background-color: transparent;
    -webkit-border-radius: 2em;
    -moz-border-radius: 2em;
    border-radius: 2em
}
/*定义滑块 内阴影+圆角*/
::-webkit-scrollbar-thumb {
    background-color: #5459BB;
    background-image: -webkit-linear-gradient(45deg,rgba(255,255,255,.4) 100%,transparent 100%,transparent 50%,rgba(255,255,255,.4) 50%,rgba(255,255,255,.4) 75%,transparent 75%,transparent);
    -webkit-border-radius: 2em;
    -moz-border-radius: 2em;
    border-radius: 2em
}自定义文章头图,也就是首页文章上显示的那些图片
自定义文章头图
使用方法:
默认图片位置在 你服务器文件路径usr/themes/handsome/assets/img/sj,你可以使用你喜欢的图片进行替换
更换主题右侧热门文字图标
自定义右侧热门文章图标
使用方法:
文章图标位置在 你服务器文件路径usr/themes/handsome/assets/img/sj2,你可以使用你喜欢的图标进行替换
推荐图标网站:https://www.iconfont.cn/
此方法在主题作者用户文档中有提出
但鉴于大部分朋友使用某种物品,从不看说明书,我在这里提供修改方法
自定义添加左侧导航
使用方法:
{"name":"名称","class":"图标","link":"链接位置","target":"_blank"}
{"name":"名称","class":"图标","link":"链接位置","target":"_blank"}官方教程入口:点击进入
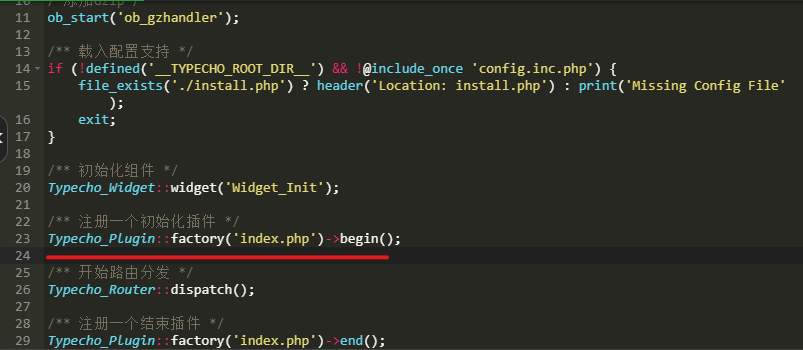
开启GZIP压缩好处显而易见,提高网页浏览速度,无论是之前说的精简代码、压缩图片都不如启用Gzip来的实在。Gzip压缩效率非常高,通常可以达到70%的压缩率,也就是说,如果你的网页有30K,压缩之后就变成了9K左右。
开启网站gzip压缩
使用说明:
在 根目录index.php文件中,在下图红线以上任意位置加入以下代码,否则可能会出现网站无法打开的情况
/** 开启gzip压缩 */
ob_start('ob_gzhandler');
可以通过此方法禁止F12,但显而易见,此操作仅防得了小白,或许小白还不知道F12是干什么的。本站未添加
禁用F12键
使用方法:
- 添加layer.js提示信息,至
后台>开发者设置>自定义输出body尾部的HTML代码
<script src="https://lib.baomitu.com/layer/3.1.1/layer.js"></script>- 将以下代码添加至后台>开发者设置>自定义JavaScript
/*禁用F12*/
document.onkeydown = function(){
    if(window.event && window.event.keyCode == 123) {
        layer.msg("F12被禁用");
        event.keyCode=0;
        event.returnValue=false;
    }
}使用此方法可以自定义网站的右击菜单,美观简洁。
自定义右键菜单美化
使用方法:
- 添加layer.js提示信息,至
后台>开发者设置>自定义输出body尾部的HTML代码
<script src="https://lib.baomitu.com/layer/3.1.1/layer.js"></script>- 将以下代码添加至
后台>开发者设置>自定义输出body尾部的HTML代码
<!-- 自定义右键菜单美化 -->
  <style type="text/css">
    a {text-decoration: none;}
    div.usercm{background-repeat:no-repeat;background-position:center center;background-size:cover;background-color:#fff;font-size:13px!important;width:130px;-moz-box-shadow:1px 1px 3px rgba
(0,0,0,.3);box-shadow:0px 0px 15px #333;position:absolute;display:none;z-index:10000;opacity:0.9; border-radius: 8px;}
    div.usercm ul{list-style-type:none;list-style-position:outside;margin:0px;padding:0px;display:block}
    div.usercm ul li{margin:0px;padding:0px;line-height:35px;}
    div.usercm ul li a{color:#666;padding:0 15px;display:block}
    div.usercm ul li a:hover{color:#fff;background:rgba(170,222,18,0.88)}
    div.usercm ul li a i{margin-right:10px}
    a.disabled{color:#c8c8c8!important;cursor:not-allowed}
    a.disabled:hover{background-color:rgba(255,11,11,0)!important}
    div.usercm{background:#fff !important;}
    </style>
<div class="usercm" style="left: 199px; top: 5px; display: none;">
    <ul>
        <li><a href="https://xxx.com/"><i class="fa fa-home fa-fw"></i><span>首页</span></a></li>
        <li><a href="javascript:void(0);" onclick="getSelect();"><i class="fa fa-copy fa-fw"></i><span>复制</span></a></li>
        <li><a href="javascript:void(0);" onclick="baiduSearch();"><i class="fa fa-search fa-fw"></i><span>搜索</span></a></li>
        <li><a href="javascript:history.go(1);"><i class="fa fa-arrow-right fa-fw"></i><span>前进</span></a></li>
        <li><a href="javascript:history.go(-1);"><i class="fa fa-arrow-left fa-fw"></i><span>后退</span></a></li>
        <li style="border-bottom:1px solid gray"><a href="javascript:window.location.reload();"><i class="fa fa-refresh fa-fw"></i><span>重载网页</span></a></li>
        <li><a href="https://blog.raycns.com/links.html"><i class="fa fa-meh-o fa-fw"></i><span>和我当邻居</span></a></li>
           <li><a href="https://blog.raycns.com/say.html"><i class="fa fa-pencil-square-o fa-fw"></i><span>给我留言吧</span></a></li>
    </ul>
</div>
<script type="text/javascript">
    (function(a) {
        a.extend({
            mouseMoveShow: function(b) {
                var d = 0,
                    c = 0,
                    h = 0,
                    k = 0,
                    e = 0,
                    f = 0;
                a(window).mousemove(function(g) {
                    d = a(window).width();
                    c = a(window).height();
                    h = g.clientX;
                    k = g.clientY;
                    e = g.pageX;
                    f = g.pageY;
                    h + a(b).width() >= d && (e = e - a(b).width() - 5);
                    k + a(b).height() >= c && (f = f - a(b).height() - 5);
                    a("html").on({
                        contextmenu: function(c) {
                            3 == c.which && a(b).css({
                                left: e,
                                top: f
                            }).show()
                        },
                        click: function() {
                            a(b).hide()
                        }
                    })
                })
            },
            disabledContextMenu: function() {
                window.oncontextmenu = function() {
                    return !1
                }
            }
        })
    })(jQuery);

    function getSelect() {
        "" == (window.getSelection ? window.getSelection() : document.selection.createRange().text) ? layer.msg("啊噢...你没还没选择文字呢!") : document.execCommand("Copy")
    }
    function baiduSearch() {
        var a = window.getSelection ? window.getSelection() : document.selection.createRange().text;
        "" == a ? layer.msg("啊噢...你没还没选择文字呢!") : window.open("https://www.baidu.com/s?wd=" + a)
    }
    $(function() {
        for (var a = navigator.userAgent, b = "Android;iPhone;SymbianOS;Windows Phone;iPad;iPod".split(";"), d = !0, c = 0; c < b.length; c++) if (0 < a.indexOf(b[c])) {
            d = !1;
            break
        }
        d && ($.mouseMoveShow(".usercm"), $.disabledContextMenu())
    });
</script>自适应视频尺寸,不会像以前嵌入视频时尺寸大小出现错误
文章内挂载视频
使用方法:
将以下代码添加至 Handsome主题外观>设置外观开发者设置>自定义CSS
/*视频挂载*/

.iframe_video {
position: relative;
width: 100%;
}

@media only screen and (max-width: 767px) {
.iframe_video {
height: 15em;
}
}

@media only screen and (min-width: 768px) and (max-width: 991px) {
.iframe_video {
height: 20em;
}
}

@media only screen and (min-width: 992px) and (max-width: 1199px) {
.iframe_video {
height: 30em;
}
}

@media only screen and (min-width: 1200px) {
.iframe_video {
height: 40em;
}
}

.iframe_cross {
position: relative;
width: 100%;
height: 0;
padding-bottom: 75%
}

.iframe_cross iframe {
position: absolute;
width: 100%;
height: 100%;
left: 0;
top: 0
}
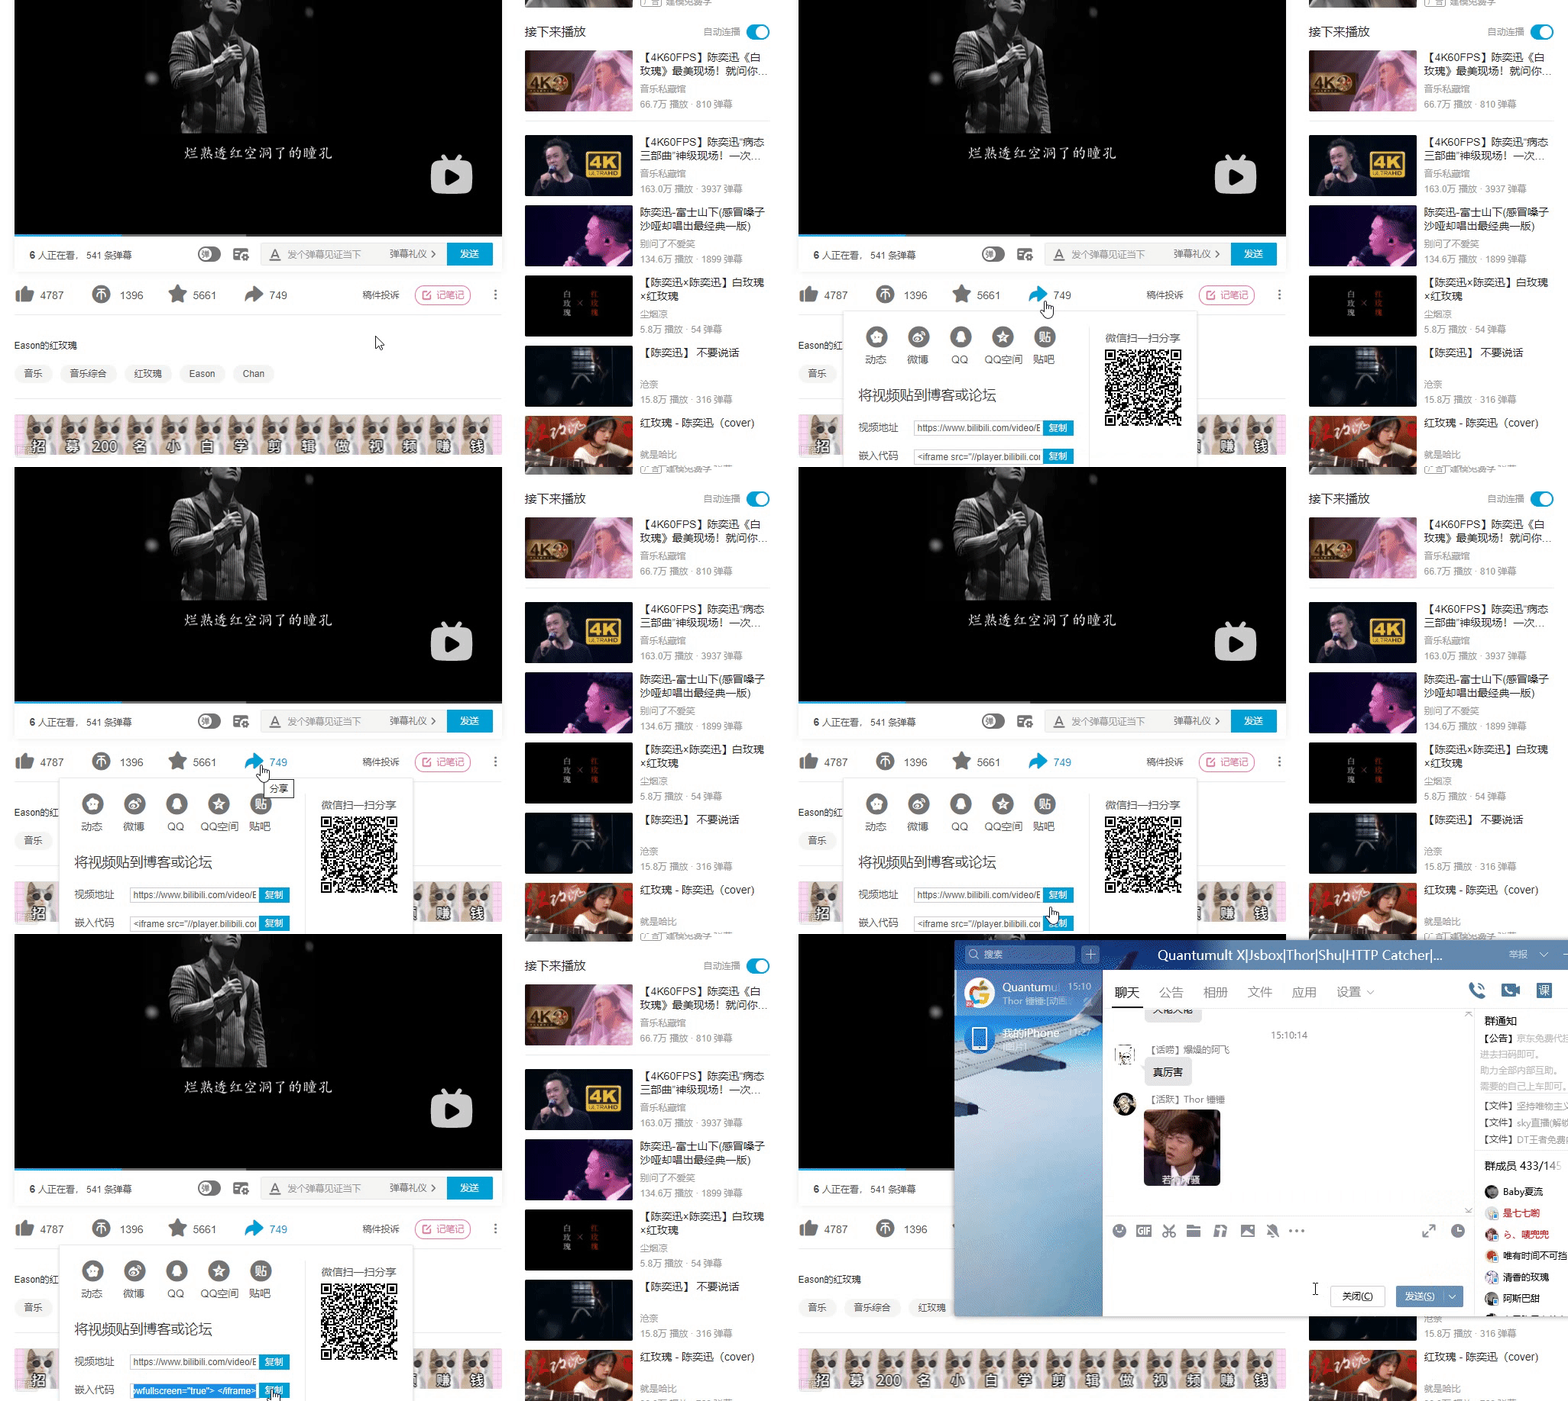
演示
- 打开你想挂载在网站的b站视频
- 复制视频源代码(打开
b站视频链接>点击转发图标>复制嵌入代码,如下图所示|需打开电脑版网站)
- 在复制的嵌入链接的
iframe与src之间添加class="iframe_video" - 完成,刷新网站感受效果吧
Typecho安装完后,默认后台路径为 xxx.com/admin,存在安全隐患,为了提高博客安全,可将默认路径修改
自定义后台路径
使用方法:
- 修改根目录admin文件夹名称为XXX
- 打开根目录下的config.inc.php文件,找到以下代码
/** 后台路径(相对路径) */
define('__TYPECHO_ADMIN_DIR__', '/admin/');将上述代码中的admin修改为XXX
- 刷新缓存,即可查看效果
为博客开启在线客服,我想大部分人都不需要吧,所以放到了最后
在线客服Crisp
使用方法:
- Crisp账户
注册Crisp账户,并添加网站信息,注册地址[https://app.crisp.chat/] - 获取Crisp代码
后台--网站设置--显示整合--HTML中复制代码 - 代码插入
开发者设置--自定义输出head头部的HTML代码


20 条评论
哈哈哈,写的太好了https://www.lawjida.com/
《小心孩子!》科幻片高清在线免费观看:https://www.jgz518.com/xingkong/73389.html
《同志亦凡人第五季》欧美剧高清在线免费观看:https://www.jgz518.com/xingkong/45578.html
你的文章让我学到了很多知识,非常感谢。 https://www.4006400989.com/qyvideo/58999.html
你的文章让我感受到了不一样的视角,非常精彩。http://www.yzyzxs.com
看的我热血沸腾啊www.jiwenlaw.com
看的我热血沸腾啊https://www.237fa.com/
Hi,友链一个可以吗?
博客名称:乔戈路阔阔;
博客网址:https://chelgr.com;
博客头像:https://chelgr.com/share/chelgr-com-icon.png;
博客介绍:缅怀过去 | 记录现在 | 心存未来...
感谢博主分享
你好,我想知道文章介绍下面随机格言的功能是如何实现的,我看博主的文章中没有介绍。希望能介绍一下,谢谢博主。
在主题设置的博主介绍中键入以下代码实现正在加载今日诗词....
网站整个透明请问是怎么实现的
在Handsome主题后台,设置外观,展开所有搜索炫酷透明模式
这个是主题自带的
已经解决了,因为我用的是8.2.1的 更新8.4就好了
博主你好,我替换了usr/themes/handsome/assets/img/sj目录下的所有图片。但是刷新后还是显示初始博客的那几张图片,请问是什么问题呢?
替换之后需要刷新缓存的,可以试一下
哈喽 你这个鼠标右键美化代码 复制后 点击首页会链接到阿里云盘 OωO
将代码中首页前面的网址更换成你的网址,注意http(s)